Nginx SSL Certificate and HTTPS Redirect Errors

Introduction
Nginx is a popular web server that can host many large and high-traffic sites on the internet. After installing Nginx, your website defaults to accepting requests for HTTP traffic. This is not the most secure option for your website. For this reason, you may choose to redirect your HTTP traffic to HTTPS, which is for encrypted traffic and verified with a TLS/SSL certificate. Even with resources such as Let’s Encrypt or Cerbot to help automate the process of obtaining a certificate and assisting in the redirect to HTTPS process, there are still errors that can occur with your Nginx web server.
The examples in this guide were tested on an Ubuntu 22.04 server but should be applicable to most Nginx installations. Most of these errors can be resolved within the scope of Nginx’s standardized configuration file, although directories and paths may differ slightly.
In this tutorial, you will learn about common errors that can emerge when setting up TLS/SSL certificates and HTTPS redirect connections for your Nginx server. You will also learn how to identify possible causes for these redirect errors and fix them.
Inspecting Your Nginx Error Log
The errors and solutions presented in this tutorial are common cases, but not exhaustive. Due to the nature of syntax errors breaking the structure of what Nginx recognizes as valid statements, the following errors are only guidelines for how Nginx responds. Oftentimes, one error can cascade into another, and an error can be symptomatic of a larger or separate issue. Your specific circumstance and setup may vary.
Please note that you can always refer to the Nginx error log to view a running list:
Verifying Your Redirect Directive for your Server Block
If you are experiencing issues with your website not redirecting from HTTP to HTTPS, there may be an issue with the directive you have set up in your configuration file. Specifically, the listen directive should be pointing to the appropriate port, in this case, 443, which signifies the encrypted HTTPS traffic. For context, if you set up a server domain block for your Nginx web server, your configuration may follow this structure:
The contents of this file provide details on several directives, but the most important one to pay attention to is the listen one. Right now, this directive is only allowing incoming requests for port 80, which is the default for Nginx. This port is also for HTTP traffic, not HTTPS. To allow for the redirection of HTTP traffic to HTTPS, you need to update the listen directive to include port 443.
One way you can do this efficiently is by obtaining a TLS/SSL certificate from a Certificate Authority (CA) such as Let’s Encrypt. Having a certificate for your website helps enable encrypted HTTPS for web servers.
Additionally, obtaining and installing this certificate is completely automated for Nginx via a software client called Certbot, which has a plugin for Nginx. You can allow Certbot to automatically configure your Nginx configuration file to redirect all HTTP traffic to HTTPS, and disallow direct HTTP traffic. You can also do this manually if you prefer, and the same principles apply. Learn more about how to do this with our tutorial on How To Secure Nginx with Let’s Encrypt. For the purposes of this tutorial, we have obtained a certificate through Let’s Encrypt, and the configuration file is updated to the following:
If you compare this server domain block with the first example, you can assess the changes that were made as a result of the automated steps managed by Certbot to set up the SSL certificate. More importantly, the listen directive is now pointing to port 443, which means that HTTPS connections are allowed. The certificate and key that were generated by Certbot through Let’s Encrypt are also now associated with your server block.
Additionally, Certbot restructures your server block to redirect all HTTP traffic to HTTPS. You now have an additional server block, which handles your original listen directive on port 80. This new server block catches all traffic to your domains by doing a conditional check on the $host variable. This is executed with the conditional if directive statements. These directives check if the variable matches your domains, then Nginx uses a 301 redirect to send the request to the HTTPS version of the site. Moreover, as a failsafe, any traffic that manages to get through the conditional redirect will be caught as a 404 error.
If you’re still having issues, however, you may want to check your firewall settings and adjust them if needed.
Adjusting Your Firewall Settings
If your web browser isn’t responding even after you’ve set up the TLS/SSL certificate, then you may have an issue with your firewall settings. As mentioned in the previous section, the redirect from HTTP and HTTPS is automatically set up as a listen directive in your configuration file if you followed the Let’s Encrypt tutorial. Therefore, one possible cause for error is that your firewall is not allowing HTTPS traffic on port 443.
To check the status of which ports are currently open on your firewall, you can run the following command. Keep in mind that this tutorial is using the Uncomplicated Firewall, UFW, so this may differ depending on your distribution:
Status: active

To                         Action      From
--                         ------      ----
OpenSSH                    ALLOW       Anywhere
Nginx HTTP                 ALLOW       Anywhere
OpenSSH (v6)               ALLOW       Anywhere (v6)
Nginx HTTP (v6)            ALLOW       Anywhere (v6)
If your output reflects a list similar to the following, then this means your firewall is currently only open for accepting requests from HTTP. To adjust these settings, you want to add the Nginx HTTPS profile that allows for TLS/SSL encrypted traffic via port 443. To do this, run the following command:
If you received an output of Rule added, then you successfully added this profile to your list. You can confirm by checking the status:
Status: active

To                         Action      From
--                         ------      ----
OpenSSH                    ALLOW       Anywhere
Nginx HTTP                 ALLOW       Anywhere
Nginx HTTPS                ALLOW       Anywhere
OpenSSH (v6)               ALLOW       Anywhere (v6)
Nginx HTTP (v6)            ALLOW       Anywhere (v6)
Nginx HTTPS (v6)           ALLOW       Anywhere (v6)
Note: There is an Nginx profile available called Nginx Full that opens both HTTP and HTTPS port connections. If you want to clean up the list, you can remove the two rules with sudo ufw delete allow 'Nginx HTTP' and sudo ufw delete allow 'Nginx HTTPS', and add the following rule:
Your firewall is then ready to accept connections from HTTP and HTTPS traffic.
Now both the Nginx HTTP and HTTPS profiles are listed, port 443 is open, and requests will redirect to HTTPS.
Setting Up Your Redirect Securely with a TLS/SSL Certificate
Redirecting HTTP to HTTPS means you are allowing for encrypted traffic connections, and this is typically verified with a TLS/SSL certificate. However, there are still possible error messages at the browser-level. Keep in mind these error messages do not mean something is wrong with your Nginx server, but rather the certificate itself.
For example, if you’re using a self-signed SSL certificate, this is not verified by a Certificate Authority (CA) such as with Let’s Encrypt. As a result, when you navigate to your browser at https://example.com, a message prompt will likely appear as a warning to visitors that this site is unsafe:
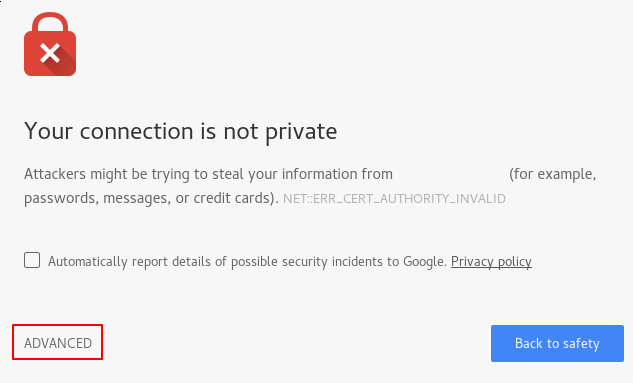
In this scenario, there is an error that reads Your connection is not private and has a specific error stating NET::ERR_CERT_AUTHORITY_INVALID. It is possible to surpass this despite the certificate not being secure if you press on the Advanced option:
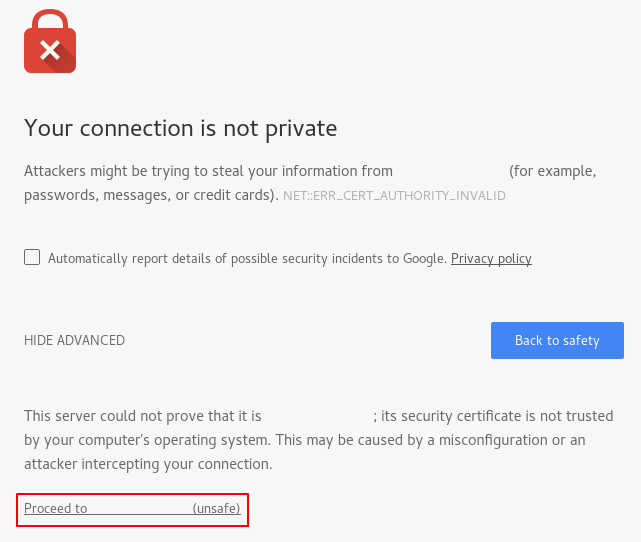
The Advanced option details that example.com cannot be adequately identified. Even though this may not be true because you set up your web server with a self-signed SSL certificate, this is how it is perceived by anyone who visits your site.
Although you can continue on to your website by pressing the Proceed to… option, it is a poor user experience to receive this type of security and privacy message upon visiting your site. You will want to use a certificate that is verified by a CA. You can set this up by reading our tutorial on How To Secure Nginx with Let’s Encrypt.
However, it is possible to receive the following message even if you do have a TLS/SSL certificate set up through Let’s Encrypt:

This message differs from the original Your connection is not private message because the network error states NET::ERR_CERT_DATE_INVALID, meaning that your current SSL/TLS certificate has expired. It’s important to note that a Let’s Encrypt certificate is only valid for 90 days. If you used the certbot package when installing Let’s Encrypt, a check for expiring certificates within the next 30 days will be scheduled, and this will run twice a day through systemd.
You can check the status of the timer with the following:
The output will confirm that your certificate renewal is active.
However, if your certificate has expired and you want to force renewal, you can do so with the following command. This is also useful to do if you have different domains you want to renew a certificate for:
Even though the certbot package comes with a certificate renewal script with /etc/cron.d, there are other options as well. For example, you can set up the renew_hook option with Certbot so that you can run other tasks after renewal. To do this, you need to add renew_hook to the Certbot renewal configuration file. Begin by opening up the file with your preferred text editor:
Once you’re inside the file, add the hook to the last line to reload the web-facing services so that they can be set up to use the renewed certificate:
Once you’re finished, you can save and close the file. If you’re using nano, press CTRL + X, Y, and then ENTER.
No matter what you choose when setting up your certificate renewal process, you can always confirm that certbot is running the renewal process as intended with the following command:
Finally, check for any syntax errors with sudo nginx -t and then restart Nginx with sudo systemctl restart nginx to ensure your changes are implemented. After you’ve done all of this, navigate to your web browser at https://example.com to confirm the redirect is working correctly.
Conclusion
In this tutorial, you learned how to address common errors with Nginx web server redirects, specifically from HTTP to HTTPS. Some of these solutions include verifying that your configuration file is set up correctly to listen for the appropriate port, opening your firewall to receive those connections, and how to handle security error messages you may receive regarding SSL/TLS certificates that are not verified or expired. If you’re interested in learning more about Nginx, you can check out our tagged Community page, or jump into learning how to install Nginx on Ubuntu 22.04.


Nhận xét
Đăng nhận xét